Quantcast
Channel: Adventures In Acetone
Viewing all 679 articles
Browse latest View live

KBShimmer Thick/Thin Connected Lines Nail Vinyl Review!

$
0
0
Press Sample

Good morning, readers! Yesterday, I showed you one set of new KBShimmer Spring 2015 nail vinyls-- the swirls. Today, I have another of the new sets to share with you. These are the thick/thin connected lines and are extra long for those of you with long nails. I love connected lines in nail vinyls, the connected chevrons are a favorite of mine and I was excited to try these. The connected sides make for easy positioning (no having to guess at even spacing between stripes) and removal all at once instead of peeling each stripe off one at a time. 

I'm still trying to decide if I like negative space manis on my nails so this was a perfect opportunity to try using nail vinyls.


These are extra long for the long nailed ladies out there. As you can see below, I'm not one of those. I have super shorties right now after a break this weekend. My middle finger is showing the full length of nail vinyls that come in this set. Plenty of length--I was able to cut them in half and use on 2 of my short nails. So don't think that if you have short nails like me that you will be wasting them. Cut them in half!

(If you are paying close attention, you will see that I had to readjust the index finger nail vinyl before the polish was added.)

  • Because I wanted to do a negative space mani, I only used the KBShimmer Nail Prep pH Balancing Pre-Polish Treatment on my nails before applying the nail vinyls. 
  • After applying the nail vinyls and pressing firmly on the nail, I painted one coat of KBShimmer Stonewashed over the nail and vinyl. 
  • While it was still wet, I grabbed the connected side of the vinyl and carefully peeled it across the nail to reveal the thick or thin lines. 
  • At this point, I decided that just stripes with negative space wasn't a look I was digging, so I added a coat of KBShimmer Prism Break for some holo sparkle.
  • KBShimmer Thistle Be the Day and a toothpick were used to add dots in between the stripes.
  • On the middle nail, I did even smaller dots of KBShimmer Stonewashed on the purple dots.
  • KBShimmer Clearly On Top was used to seal it all in.


What do you think of these new nail vinyls? I really liked that there are 2 stripe thickness options on the sheet so you can switch it up a bit. I also like the longer size so they are useful to a bigger variety of nail lengths. I am definitely happy that the edges are connected as well. The vinyls adhered nicely and I can't wait to try them in some different mani ideas in the future! 

These nail vinyl sheets are releasing this Friday February 6, 2015 for $5 a sheet (32 connected pieces on one sheet--plus the left over inner strips that are left on the sheet when you peel them up) at their website: www.kbshimmer.com. For sales outside the U.S., visit www.harlowandco.orgThanks so much for reading!

*The vinyls in this post were sent for me to review with my honest opinion.


KBShimmer Spring 2015 Nail Vinyls Review!

$
0
0
Press Sample

Good afternoon, readers! I have the third and final new sheet of nail vinyls that released TODAY by KBShimmer. Take a look ay my previous reviews of the new colors, swirl vinyls, and thick/thin connected lines if you missed any of them this week. 

This nail vinyl sheet is full of Spring/Easter designs for loads of options when it comes to usage and manis. I've used most of the different designs in these 2 "skittle" manis to show you some options and ideas of how you could use the different designs. I have some favorites and I know I'll be taking single nail ideas and putting them into a full mani the next time I use them. Let's take a look!

This Spring Nail Vinyl Sheet consists of: "93 Pieces of springtime fun, including eggs, bunnies, flowers, butterflies, zig zags, and thick/thin lines for creating Easter Eggs on your nails! "

Some of those pieces are strings, while others are individual shapes. Here is an image from the site to show you exactly what you are getting(the pieces between the chevrons and stripes are also cut out so you get more of those than shown:

Let's see what I did with this sheet! As you can see below, the vinyls are in gold and can absolutely be used as stickers on the nail and not how I am using them.

Look #1:
(I did press the vinyls down more after taking this picture and they adhered fine, the photo is deceiving)

I painted a white base color on all nails before the next steps below. (Note: I used KBShimmer Clearly On Top quick dry top coat in between the base designs and the nail vinyls and let it dry 15-30 minutes before applying the nail vinyls.)

  • Index: I used KBShimmer Blue-ed Lines, Blush Money, Ins and Sprouts, and Thistle Be the Day over the white base. I wiped most of the polish off of the brushes and swiped them down the nail in different places. Then, I applied 2 different sized flowers and a single butterfly each hanging part way off of the nail for easy removal. I painted one coat of KBShimmer How You Dune? over the entire nail and used tweezers to remove the vinyls.
  • Middle: I used a makeup sponge to do a gradient of KBShimmer Blush Money and Ins and Sprouts on the entire nail. I applied a single tulip vertically on the nail and then used the sponge to do the same gradient, but inverted. Once I was happy with the coverage of the new gradient, I used tweezers to remove the vinyl.
  • Ring: I painted two coats of Thistle Be the Day. I applied a string of flowers and a string of butterfly vinyls and then painted a coat of How You Dune? on top. I used tweezers to carefully peel off the vinyls.
  • Pinky: I painted two coats of Blush Money and applied the string of tulips on top. Then, I painted a coat of KBShimmer Hugs and Wishes on top before peeling off the vinyl with tweezers. 
I used one coat of KBShimmer Clearly On Top to seal in the designs.


Look #2:

I painted a white base coat and one coat of KBShimmer Clearly On Top and let dry for 15-30 minutes before applying the nail vinyls below.


  • Index: I was going for an easter egg nail so I applied one chevron and one thin line on the nail. Then, I painted each of the sections with: KBShimmer Thistle Be the Day, Blue-d Lines, and Ins and Sprouts. I used tweezers to carefully peel the vinyls off.
  • Middle: I applied one of the bunny+flower strings and painted over it with a coat of KBShimmer Hugs and Wishes. Before I peeled it off, I added a coat of Prism Break for some holo sparkle. I used tweezers to carefully peel off the vinyl.
  • Ring: I used a string of eggs horizontally on the nail. I painted Blush Money on the top half and Ins and Sprouts on the bottom half. While still wet, I used tweezers to carefully peel the egg string back off.
  • Pinky: I placed one of the smallest single bunny vinyls on the nail, barely hanging off the tip so I could peel it back up again. I painted one coat of Blush Money on top and peeled the bunny off with tweezers.
I used a coat of KBShimmer Clearly On Top to seal it all in.


There you have it! There are only a few that I didn't get to use yet from the sheet (string of bunnies+eggs, medium and large bunnies, and single eggs) but I hope this gives you a good idea of looks you can create with it. 

Some notes: I used a toothpick to punch some of the centers of the flowers out because they didn't all stay on the sheet when I pulled them up. Not an issue in my opinion since it is such a small cutout but I thought you all should be aware of it. Also, these nail vinyls seem a little thicker or less flexible than the previous sets I have reviewed because of the shiny gold sheet material. They still work well but I wanted to let you know so you weren't surprised when you received them.

There are 93 total pieces on this sheet and it is available now for $5 at their website: www.kbshimmer.com. For sales outside the U.S., visit www.harlowandco.orgThanks so much for reading!


*The vinyls in this post were sent for me to review with my honest opinion.


Swatch Saturday: Zoya Delight Collection!

$
0
0
Press Sample

Good morning, readers! I have the latest collection today by Zoya for Spring 2015: Delight. Of the 6 new colors, 3 are cremes and 3 have gorgeous shimmer. I really like these colors together and already used them in a nail art manicure that I posted last weekend. Let's take a look at each color individually below!

Before we get to the photos, a note on the formulas. Most needed 3 coats-- the shimmers are sheer to hold the shimmer so the three coats is to get to full opacity. The cremes, however, I just had a hard time getting them completely opaque and even without any lighter patches. Pastel cremes usually are a bit of a pain and these are no exception. I personally think that I'll use them more in nail art and not full manis because of this. They did dry to a nice shine, though, and they leveled nicely. 

Zoya Eden
Classy spring flower pink in a glossy creme finish.
I'm showing three coats below without top coat.


Zoya Tiana
Palette-cleansing 'pistachio gelato' green in a glossy creme finish.
I'm showing three coats below without top coat.


Zoya Lillian
Faded aquamarine with a glossy creme finish.
I'm showing three coats below without top coat.
This one was the closest to 2 coats out of the cremes but I still had a few patches that I covered with the third coat.


Zoya Leslie
Soft spring lavender with a turquoise metallic finish.
I'm showing two coats below without top coat.
This is one of my favorites in the collection, the color combo of shimmer and base is lovely. Even more in person than the photos show. There was slight visible nail line at 2 coats but with the shimmer I didn't feel the need to apply a third. 


Zoya Rayne
Dewy, spring blue with an energizing turquoise metallic flash.
I'm showing three coats below without top coat.
Although I think they all have the same shimmer, the shimmer in Rayne just seems on overdrive compared to the purple and yellow. There is so much shimmer it almost has brushstrokes during application. Very pretty and my other favorite from the collection.


Zoya Daisy
Refreshing 'lemon merengue' yellow with a turquoise metallic flash.
I'm showing three coats below without top coat.
Even at three coats, I can see some visible nail line. Pretty color though.


What do you think of this new collection? These are available NOW for $9 each! Which are your favorites? Thanks so much for reading!


Available in top salons, spas and on zoya.com.

*The polishes in this post were sent for me to review with my honest opinion. 


The Digit-al Dozen DOES Patterns On Patterns, Day 1: Beehive Nails

$
0
0
Good evening, readers! It's the start of a new nail art week with The Digit-al Dozen. This month's theme is Patterns On Patterns and it's certainly a challenging concept. I'm starting out the week with a subtle stamped honeycomb pattern topped with simple bees arranged like polka dots. I've used one of the new OPI Hawaii Collection polishes as my base because they all arrived on my doorstep this morning and I couldn't wait to try them out!


  •  I started with a base of OPI Is Mai Tai Crooked?
  • Then, I stamped with China Glaze Passion using the honeycomb image on the Bundle Monster BM:422 stamp plate.
  • Once that was dry, I used a nail art brush and freehanded some simple bees using OPI Good Grief!, Black Onyx, and My Boyfriend Scales Walls.
  • After a coat of KBShimmer Clearly On Top, I added one coat of Zoya Matte Velvet Top Coat.


What do you think? Thanks so much for reading and come back tomorrow for another Patterns on Patterns creation!


The Digit-al Dozen DOES Patterns On Patterns, Day 2: Vera Bradley Mocha Rouge Nail Art!

$
0
0
Good morning, readers! I have a fun manicure for Day 2 of Patterns on Patterns Week with The Digit-al Dozen! Instead of trying to come up with a random pattern combo, I looked in my closet at my Vera Bradley purse collection and found a great example of patterns on patterns! I've recreated this floral on floral design called Mocha Rouge and I love how it turned out!


  •  I started out with 2 coats of Zoya Nyssa and topped with KBShimmer Clearly On Top to speed up the drying process.
  • Next, I stamped a floral image using Sinful Colors Black on Black from the Cheeky CH12 stamp plate.
  • Then, I took my nail art brushes and dotting tool and painted some of the  bigger white and pink flowers using OPI Alpine Snow, OPI Black Onyx, OPI Sorry I'm Fizzy Today, and OPI Feeling Hot-Hot-Hot! 
  • I sealed everything in with KBShimmer Clearly On Top followed by a coat of Zoya Matte Velvet Top Coat.


Here is a bonus shot with my purse! It's a Vera Bradley Mandy in Mocha Rouge. I've had it for years and I think I definitely need to start doing more of my Vera Bradley purse designs on my nails!

Thanks so much for reading! Come back tomorrow for the next Patterns on Patterns design!


The Digit-al Dozen DOES Patterns On Patterns, Day 3: OPI Hawaii Collection Stripes + Dots!

$
0
0
Press Sample

Good morning, readers! I have a colorful manicure today for Day 3 of Patterns on Patterns Week with The Digit-al Dozen! The 2 easiest patterns for nail art are stripes and polka dots--so I've decided to combine them! I've used the entire new OPI Hawaii Collection (minus the yellow glitter called Pineapples Have Peelings Too!) for the base stripes of this mani. I think it's fun to see them all side by side, and they made a bright base for the bold polka dots.

  • I started out with a white base coat of OPI My Boyfriend Scales Walls.
  • Then,  I took a striping brush and did random vertical lines of the OPI Hawaii Collection.
  • Lastly, I used a born pretty stamping plate image of polka dots and stamped those on top using Sinful Colors Black on Black.
  • KBShimmer Clearly On Top was used to seal it in and add shine.


What do you think? I think it's fun to see a collection of polishes in one mani. You can see how different and colorful the Hawaii Collection is! I should have that collection up as swatches in the next week or two so check back for that! Thanks so much for reading!


The Digit-al Dozen DOES Patterns On Patterns, Day 4: Stripes, Dots, and Roses!

$
0
0
Good morning, readers! This Patterns on Patterns Week is really kicking my creative butt. I am torn at what to combine and it's proving to be difficult. However, I was scrolling through Facebook yesterday and Paulina's Passions posted the most perfect "pattern on pattern" idea WITH a tutorial and I desperately had to recreate it for today. So a huge thank you goes out to Paulina for saving the day!! Her original design had pink roses so I tried purple as to not be a complete copycat the day after she posted. Let's take a look!


  •  I started out with 2 coats of OPI My Boyfriend Scales Walls topped with KBShimmer Clearly On Top to speed up the drying process.
  • Then, I used some thick striped nail vinyls and placed a couple horizontally across the nails.
  • OPI Who Are You Calling Bossy? was then painted over the entire nail.
  • I used tweezers to peel up the vinyls before the polish dried.
  • Next, I used a dotting tool and China Glaze Passion to add gold dots on the stripes.
  • Once dry, I followed the rest of Paulina's tutorial to make the purple roses with gold leaves. The purples used were: OPI Lost My Bikini in Molokini, Hello Hawaii Ya?, Viking In A Vinter Vonderland, and Rumple's Wiggin'. 
  • KBShimmer Clearly On Top was used to seal the design. 


What do you think? This ranks up there with my other floral look this week for favorites. I can't believe I'm saying this, but florals are starting to grow on me and I love this look. Thanks so much for reading! Come back tomorrow for the final Patterns on Patterns Week mani!


The Digit-al Dozen DOES Patterns On Patterns, Day 5: Chevrons and Cheetah Print with Elevation Polish!

$
0
0
Good afternoon, readers! TGIF! It's the final day of Patterns on Patterns Week with The Digit-al Dozen and I am really enjoying my final design! I used three shimmery Elevation Polishes, some chevron nail vinyls from KBShimmer, and a dotting tool to create freehand cheetah spots.


  •  I started out with 2 easy coats of my new favorite white: Elevation Polish Yeti Hugs: Feel So Close. This was a limited edition from January so you wouldn't be able to get it on the site anymore. I'm already regretting not getting a second one. It has gorgeous shimmer in it.
  • One coat of KBShimmer Clearly On Top was used to speed up the drying process before adding nail vinyls.
  • Once I was certain the base was dry, I applied the connected chevron nail vinyls from KBShimmer. They are so easy to use because they are one piece for the entire nail and there is no frustration with getting the spacing even, and it peels all of the chevron stripes off at one time.
  • One nail at a time, I painted a coat of Elevation Polish Atop A Ferris Wheel(this was also a limited edition polish. From A Box, Indied in July so I apologize for enticing you with something hard to find at this point). Before moving onto the next nail, I peeled up the chevrons while the purple was still wet. 
  • After I completed all of my nails with the chevrons, I used a dotting tool dipped in a puddle of Elevation Polish Theo Wirth Parkway (guess what? this one is brand new this month so it should be around a while for you!) to dab some cheetah spots over the entire nail. I did squiggly C shapes and some dragged dots in between. 
  • Once I was happy with the coverage, I added 2 coats of KBShimmer Clearly On Top to seal in the design and try to level out the layers. It's still not completely flat on the surface but close!


What do you think? I'm really digging it and am excited to wear it as a full mani for the weekend. I was worried that the double pattern would be overwhelming, but I think the mellow chevron colors are a muted background to the darker spots. Thanks so much for reading! Have a great weekend!


Swatch Saturday: Alter Ego Nail Enamels egoSCENTrics Collection!

$
0
0
Press Sample

Good morning, readers! Happy Valentine's Day if you are celebrating! We have a fun family day planned so no valentines nail art from me today. Instead, I have a new collection by Alter Ego Nail Enamels that launches today at Noon (CST). Alongside 5 new gorgeous polishes, there is a new product called egoSCENTrics! They are moisturizing perfume sticks that can also be used as a cuticle balm! Let's check everything out!

Let's start with the new polishes first! As you may remember from my many previous posts on Alter Ego Nail Enamels, Cynthia uses a different kind of base for her polishes than you see with most other indies. It dries to a slightly textured matte, which to me just gives you two options on how to wear that polish. Loads of her polishes I prefer to wear without top coat. These new ones, however, I decided to use top coat for my photos because I preferred them that way due to the shimmers in them really sparkling with the added top coat. 

Some formulas can be a bit thicker so I easily thin them to my own preference for application by adding a few drops of rubbing alcohol. Also, Cynthia always throws in a free She Shines top coat with your order. It is a thinner top coat so you may want more than one coat of it to cover the textured finish. (Looking back at my photos now, it seems the top coat dried while I was taking my photos and I could have used another coat on some.)

Alter Ego First Love
No matter how old we get, we can never forget the thrill of our First Love. The memories of those emotions, hopes and dreams can make us blush all shades of pink to purple, just like the stunning bouqets of fresh lilacs her suitor always gave her!
I'm showing three coats below with top coat.
I did thin this one a bit but I preferred three thinner coats to showcase more of the gorgeous shimmer. This is definitely my favorite of the collection, stunning!!


Alter Ego Secret Lover
Furtive glances, light touches and dreamy eyes, all signs that this gal has a Secret Lover. There may not be anything that her family and friends would think of as "wrong" with the person of her devotion, she just wants tend to the relationship as carefully as she tends to the gardenias her paramour gave her their first date. In public she wears a simple red but when she dons a top coat the glimmering gold her lover denotes shines through!
I'm showing three coats with top coat below.
I thinned this just a bit. The gold bits are holo and much prettier in person than my lightbox was showing. Check out the macro for a little preview of how they reflect the light. Very pretty!
(This was one that I really needed a second coat of top coat)


Alter Ego Night Owl
Some people are early risers but this girl likes to sleep late because she's a bona fide Night Owl:) She wakes up to her true potential when the sky turns that stunning shade of deep bluish black, her bits and pieces of stunning gold and silver as evident as the colorful plumerias she wears in her hair!
I'm showing two coats below with top coat.
I didn't thin this one, it had great coverage and the glitters pop so well against the deep base.


Alter Ego Bubbly
Happy, cheerful and exhuberant, this girl is always Bubbly , just like the champagne she adores! My favorite champagnes are light golden and the tiny bubbles sparkle with pops of silver as they rise to the surface, calling me to admire their lively effervescence.
I'm showing only 2 coats below with top coat.
This is STUNNING. I gasped when I added the first coat to my nails. The flake shimmers are gorgeous for a topper over a different color, built up on it's own, or even one coat over bare nail for a classy sheer look. I didn't thin this and it looks gorgeous glossy or matte. This is another favorite, and a surprise to me at that!


Alter Ego Tangy
Your conversations with this high spirited woman are always poignant, tangy and zesty! Just as brilliant as the tangerines only available during the short winter months, this lively gal cannot be missed and needs no other decoration, she always catches the eye and stands out in a crowd.
I'm showing three coats below with top coat.
I am basically wearing orange soda on my nails. Adding top coat shows off this gorgeous jelly and first of it's kind in my Alter Ego Collection. This would be perfect for jelly sandwiches and I'll definitely be trying that soon. This one had the smoothest finish alone but needed the top coat to bring out the squishy jelly shine.


What do you think of the new polishes? Each polish has a matching egoSCENTrics perfume stick available that goes with the description. (In the future, there won't always be a matching polish to the scent.) There are only 4 ingredients (coconut oil, beeswax, sweet almond oil, and avocado oil) plus the perfume oil for the specific scent. The scents are mild and you can add a few swipes to your pulse points. They have also been used as a cuticle balm because they are very moisturizing. They are similar to chapstick consistency and you just rub it on your cuticles and then massage into the nails and skin. 

Perfume oils for each:
  • First Love: Lilac
  • Secret Lover: Gardenia
  • Night Owl: Plumeria (my personal favorite)
  • Bubbly: Champagne 
  • Tangy: Tangerine
  • There is also an unscented version available!


What do you think about this new product by Alter Ego Nail Enamels? Which scent sounds the most appealing to you? I am pretty excited about these because they are so easy to stick in a purse for any time you want some extra moisture on your nails as well as a mild perfume. 

All of these new things release TODAY, February 14th, 2015 at 12 NOON (Central) at the shop linked below. The polishes retail for $9 each and the egoSCENTrics are $3 each(.015oz).

Alter Ego Links:

Thanks so much for reading! Let me know your favorites in the comments below!

*The polishes and products in this post were sent for me to review with my honest opinion. 


Swatch Sunday: Milani Fierce Foil Collection

$
0
0
Press Sample

Hello, readers! I have a gorgeous new collection to share with you today: Milani Fierce Foil Nail Lacquers. 6 new polishes inspired by famous Italian cities that are metallic, have flakes, and I just love them! Totally glamorous--let's take a look!
"Nothing like genuine gold flecks – twirling, swirling, luminescent sparkles - to send lacquer shine straight into the stratosphere. For a multidimensional effect that only looks like you spent hours at the nail salon, paint on one of these six high-impact, trend-driven shades. Named for famous Italian cities, they span the color spectrum from the pearly-white, beachy Sardinia to the cobalt blue Venice. (They’re all so fiercely cool, it’s hard to pick a favorite!) While it goes on sheer, the gold-formula has real staying power. These hip lacquers were built to last."

Milani Sardinia
Shimmery, whitecap ivory.
I'm showing only 2 coats without top coat below.
This was gorgeous at one coat for a sheer, natural look with added glam or can be built up with 2-3 coats. 


Milani Milan
24 Karat dazzle drops.
I'm showing two coats below without top coat.
This is a stunning gold flake polish. Great coverage and would go perfectly as an accent nail if you just wanted a little glitz.


Milani Florence
Sage meets seafoam. 
I'm showing two coats below without top coat.
This is a green metallic base with gold flakes.


Milani Venice
Sheer sapphire
I'm showing two coats below without top coat.
There is slight visible nail line at 2 coats so you may prefer 3. The flakes are smaller in this and appear to be pink so they pair so gorgeously with the blue base.


Milani Rome
Brushed orchid
I'm showing two coats below without top coat.
This is so pretty, I really love it!


Milani Capri
Punchy petal pink
I'm showing two coats below without top coat.
Another gorgeous combo of shimmer, base, and flakes.


What do you think of these? I have no issues to report, all applied normally and needed 2 coats. These are all shown without top coat so the shimmers and flakes will be more sparkly with top coat in person. Which are your favorites? I was really impressed with this collection and know I'll be grabbing for them often.

These were limited edition in stores so you may or may not still find them in person. However, they are still on Milanicosmetics.com. They retail for $3.99. Thanks so much for reading!

*The polishes in this post were sent for me to review with my honest opinion. 


Elevation Polish Mill City Ruins + Nail Art!

$
0
0
Purchased
By Me

Good morning, readers! After the crazy week last week with The Digit-al Dozen, I'm wearing a simple mani today using the new Elevation Polish Mill City Ruins. It's the first thermal polish by Elevation and it's stunning with and without the thermal change! A gorgeous dusty olive green with gold flake and shimmer, I chose to pair it with a gold arrowhead geometric design. 


  •  I started out with three thin coats of Elevation Polish Mill City Ruins. You can probably get away with 2 coats but I was painting thinner coats so I went with three. 
  • Once it was dry, I used a striper brush and China Glaze Passion to create this arrowhead design. (I saw nail vinyls from Vinyl Boutique in this pattern but couldn't buy them at the time so I wanted to try to paint the lines.)
  • KBShimmer Clearly On Top was used as my top coat.


What do you think of this new polish by Elevation Polish? It changes from the darker olive while cold to a lighter green while hot. I think my photos above are of the colder color, we can compare it to this transition photo I just took with my iPhone while typing this below. (The photo below is how it looks on me unless I am washing my hands to change it colors since my nail beds are warmer than the air under the free edge.)

Mill City Ruins is currently sold out on the Elevation Polish site below, but will be restocked on the 22nd at 9am CST. I really love it and hope that Lulu keeps dabbling in the thermal formulas. Thanks so much for reading!

Elevation Polish Links:
Instagram: @elevationpolish 


Swatch Saturday: OPI Infinite Shines!

$
0
0
Press Sample

Good morning, readers! I have 6 of the new OPI Infinite Shine Gel Effects Lacquer System shades to show you today! There are 30 new colors, plus a base and top coat (both needed for the system to work correctly) that give the shine of gel polish and up to 10 days of wear, without the need to cure with a light or soak off for removal. Let's take a look at the 6 colors I received. 

Infinite Shine is applied via a three-step system; first, apply Infinite Shine Primer (Step 1) to prevent staining and increase lacquer durability. Next, select one of 30 shades (Step 2) and paint two thin, even coats for richly-pigmented, vivid color. Finally, finish with Infinite Shine Gloss (Step 3), which features a state-of-the-art gel polymer formula that cures in natural light. Product can be removed easily with Expert Touch Nail Lacquer Remover; no soaking is required. 

Some thoughts before we get to the swatches:
  • I haven't yet been able to wear these for an extended amount of time so I can't comment yet on their up to 10 days of wear time. I plan to, soon, and will write a separate post about it then. 
  • There are 30 colors, so don't look at my 6 classic shades and think it's a boring selection. There are purples, brights, greens, neutrals, etc. Probably something for every taste of creme polish.
  • The top coat doesn't allow for nail art. Even after 10+ minute wait time on the color drying before adding the top coat carefully, it pulls some color into the brush (a tell tale reason it would smear through nail art). Expect to wear these as solid colors, or with some kind of accent nails, or nail art on top of the top coat. (Not sure if that will effect the wear time.)
  • The top coat is a thicker one and therefore can cause bubbles on the finished mani. I don't recommend shaking the top coat because that will just add bubbles to the bottle. You can see some bubbles in my photos below. 
  • Though it doesn't require a UV light to cure, normal sunlight will probably help set the top coat best when you are done with your mani, so go outside when you are finished painting for a few minutes! 
  • These are very shiny when you are done with the system. My lightbox diffuses the direct light, so some photos appear to have a rubber finish. They are not, it's a classic shiny look in person.
OPI Unequivocally Crimson
A cherry red creme.
I'm showing 2 easy coats with the primer base coat and top coat below.
This is my favorite polish I was sent, gorgeous coverage and such a classy color. It's my current pedi and I love it!


OPI Raisin' the Bar
A squishy, vampy, oxblood creme.
I'm showing three coats with the primer and top coat below. This is squishy and almost a jelly type finish. I'm surprised at how much I love it, I'm not usually drawn to vampy colors but this is gorgeous.


OPI Get Ryd-of-Them Blues
A dark blue creme.
I'm showing two coats below with the primer and top coat.
Very pigmented, no staining upon removal.


OPI Pretty Pink Perseveres 
Baby pink creme.
I'm showing 4 coats below with the primer and top coat.
I was disappointed in the coverage of this one. After 4 coats, I still see streaks in person. 


OPI Tanacious Spirit
A taupe creme.
I'm showing three coats with the primer and top coat below.
I really like this neutral on my skin tone.


OPI Maintaining My Sand-ity
A putty creme.
I'm showing two coats below with the primer and top coat.
This color isn't my favorite on my skin tone, but it covered well at only 2 coats.


What do you think of these 6 colors? I know some of you have reported seeing these for months in supply shops, but I was on the lookout at my local retail stores around here and I can't find them anywhere yet. They should be available for purchase in March at Ulta and other retailers. I am so excited to see all 30 colors in person and pick a few more to add to my collection!

Infinite Shine products feature a proprietary formula and each bottle includes OPI’s exclusive ProWide Brush for the ultimate in application. OPI Infinite Shine Gel Effects Lacquer System will be available March, 2015, at Professional Salons, including Beauty Brands, beautybrands.com, Chatters, Dillard’s, Regis, ULTA and ulta.com for $12.50 ($14.95 CAN) suggested retail for each nail lacquer.

OPI is guaranteed only when purchased through authorized professional beauty outlets and prestige stores, not from a drugstore, supermarket, mass outlet or other unauthorized source.
For more information, please call Tractenberg & Co. 212.929.7979. Follow OPI on Twitter and Instagram @OPI_PRODUCTS and go to Facebook to become a fan!

ABOUT OPI
As the world leader in the professional nail care industry, OPI is committed to providing high-quality products and services to both salons and their customers, along with a focus on industry safety and innovation. Known for its exceptional formula, fashionable colors and iconic names, OPI’s heavily-pigmented lacquers are super rich, long-lasting and chip-resistant – offering an affordable luxury to consumers. OPI nail lacquer is available in over 200 shades. Each lacquer features OPI’s exclusive ProWide Brush for the ultimate in application. Currently, OPI is available in over 100 countries and retails a full line of professional items, including nail treatments, finishing products, lotions, manicure/pedicure products, files, tools, gels and acrylics. 

*The polishes in this post were sent for me to review with my honest opinion.


Swatch Sunday: Barielle Gentle Breeze Collection!

$
0
0
Press Sample

Good morning, readers! I have the newest collection by Barielle to share with you today! The Gentle Breeze Collection for Spring 2015 reflects the soft, gentle, eclectic hues of the most welcome and delightful season. Let's take a look at these 5 new shades.

Barielle Heaven Sent
A soft, creamy aquamarine.
I'm showing two coats below without top coat.
This was very opaque and I had no issues.


Barielle Champagne Bubbles
A creamy tangerine.
I'm showing four coats below without top coat.
This is a squishy jelly like formula and it is shiny without top coat. However, I wouldn't call it tangerine, it's more muted and dusty than that.


Barielle Pink Parasol
A creamy strawberry ice.
I'm showing two coats below without top coat.
It was slightly uneven at 2 coats, but I didn't feel the need to add a third.


Barielle Gray Sky
A rich, creamy glacier gray.
I'm showing two coats below without top coat.
It has a shimmer that creates a borderline frosty finish but it has great coverage.


Barielle Under The Sea
A rich, sea scuba blue shimmer.
I'm showing three coats below without top coat.
It's a tad sheer but that allows the shimmer to be seen through all of the layers. I had slight staining upon removal so be careful with extra base coat and careful removal instead of scrubbing your cotton pad across the nails.


What do you think of this new collection by Barielle? Which are your favorites? Barielle polishes contain no formaldehyde, toluene, dibutyl-phthalate, camphor, or formaldehyde resin. 

These are available now on Barielle.com for $8 each (0.45 fl oz). 

Thanks so much for reading!

*The polishes in this post were sent for me to review with my honest opinion. 


Creative Shop Stamper Review!

$
0
0
Press Sample

Good morning, readers! I hope you all had a fabulous weekend. Today's post is all about the new Creative Shop stamper from the Ukraine. Let's take a look at this short, fat, squishy stamper and compare it to a couple of others I have been using. It came with this clear business card that doubles as a really great scraper! It's now my go-to for scraping excess polish off of the stamping plates because its more flexible than a typical credit card that I was previously using. 

First things first. Let's talk about the size and shape of the stamper compared to the other 2 common stampers. I already had the classic, double ended hard Konad stamper(pink) and a double ended squishy stamper from Winstonia (white with black handle) before this arrived so that's what I'm showing for the size comparisons below.

As you can see, the Creative Shop stamper has a much bigger surface area for picking up images. I've never had long enough nails that the white stamper wouldn't work for me, but I know this is a big selling point for the longer nailed ladies. 


It is also shorter and fatter than the other 2 stampers, with just one stamp head and not the second, smaller one. I didn't ever really use the smaller ends on my other 2 stampers so I'm not missing them by using the new Creative Shop stamper.

The metal handle is a nice shape to hold in comparison to the others. The stamp head can be easily removed if you had to replace it.


The Creative Shop stamper is squishier than the other two stampers. This is really important for ladies with longer nails or high arched nails because it doesn't put too much pressure on the nails. The Konad one is terrible for that because it is too firm to press and roll across a large nail. You can see the squish in the photo below, I'm not pressing very hard for that image. I bet you could stamp on toes using this stamper, too.

Some things to note about the Creative Shop stamper:

  • Rolling is the best way to get the image off of the plate and onto the nail. I was used to pressing flat using other stampers but this stamp head doesn't grab the image as well that way, so rolling is what I recommend. I had some image stretching when I tried to press the image flat onto my nail so I had best results rolling it onto the nail as well. 
  • To clean, I recommend a lint roller or tape. I never use remover to clean stampers like this because I don't know if it will break down the silicone. Sometimes I take a piece of packing tape and loop it and press onto my glass table with the sticky side up so I can just roll the excess polish off of the stamper onto the tape before I use on the next nail.
  • The color of the stamp head isn't white so you can easily see any color of polish after you pick up the image to help with placement. This was a hard part about the white squishy stamper because using white polish was frustrating.
  • As with any new stamper or nail art accessory, you have to play with it a bit to get used to how it works and find the techniques that work best for you and your nails. 

You can see below how I used this for the stamping base of my Vera Bradley nails during the last Digit-al Dozen week. 


I've also used it in these recent manis:


I'm still getting the hang of the new stamper, you can see in my beehive mani above that I had some missing parts in the honeycomb stamped pattern. I also see some patches in my fishnet design above that. 

All in all, I do like this Creative Shop stamper. I'm still working out the best way for me to get the images to completely transfer onto my nails without the missing patches and I think rolling is going to be the winner. I'm not a pro stamper by any means so I have to practice my stamping like almost everyone else. I've also heard that priming this stamp head may get a better image, so I'll try that next. (Creative Shop sent me this awesome review video by pcontreras8nails and she mentions priming and I'll definitely have to try it now! )

To purchase this Creative Shop stamper, you can go to the following links below for your appropriate country (links provided by Creative Shop and some may be out of stock or offering pre-orders at the moment):


Have you tried the Creative Shop stamper? What are your thoughts? Tips, tricks, etc? Share with me in the comments below, I really need to expand my stamping abilities! Thanks so much for reading!

*The stamper in this post was sent for me to review with my honest opinion. 


Farewell, Parks and Rec!

$
0
0
Good morning, readers! I'm a day behind but I wanted to join in with The Lacquerologist and some others and bid farewell to Parks and Recreation. The big series finale was last night and I can't wait to watch it tonight with Mr. Adventures In Acetone. It's always sad to see a favorite show come to a close, but I am still anxious to watch the final episode. I'll be happy for closure and I hope they wrap up everyone's story lines.

I decided to take one of my favorite moments from the show and translate it onto my nails! Season 4, episode 8 is called The Smallest Park. It's the place where Ben and Leslie, ignoring how it will jeopardize their careers, decide to just be together. The scene starts with them agreeing it would be best to go their separate ways--but at the last minute they say screw it and kiss in the park. Such an emotional roller coaster for me as a viewer because I thought for sure they would be done for good. So, YAY!


I've done a simple version of The Smallest Park on my mani, complete with the lamp post they meet under! Completely silly, but perfect for the show! I just LOVE Ben and Leslie together.


Of course, the nail polish on my skin for the lamp post is already peeling off, but I figured it would be fun to add that in. I used a zillion different creme polishes by OPI and Zoya in this mani so I'm not going to bother listing them. Feel free to ask me what a specific item in the mani was painted with and I'll let you know which polish I used. 

Are you a Parks and Recreation fan? Have you watched the finale? Was it amazing? Heart wrenching? No spoilers!! AHH I can't wait until the hubby gets home tonight so we can watch it together. Thanks so much for reading! Leave me you tv show recommendations below now that one of our favs is over!

Quatrefoil Nail Art With OPI Hawaii!

$
0
0
Press Sample

Good morning, readers! Are you ready for the weekend? This weekend on Adventures In Acetone, I'll have the new OPI Hawaii Collection swatched for you. Make sure you come back to see those 12 new shades. Today, I used three of the new Hawaii colors and Vinyl Boutique nail vinyls to create this quatrefoil mani! 

A little while back, Manicurator did this gorgeous mani with some OPI Fifty Shades of Grey polishes and I had to run to Vinyl Boutique right away to buy them for myself! I still want to recreate Victoria's mani, but in an attempt to be different, I grabbed three OPI Hawaii Shades

What's your biggest pet peeve about using nail vinyls? Mine is definitely the uneven surface, even after top coat. In an attempt to help, I decided to use tiny pieces of torn makeup sponge to sponge the top colors for a thinner layer. It was very time consuming but it did help with the thickness of the top layer. The lines aren't perfectly crisp, though, from the sponging, so I guess you have to give and take. 

Here's how I did it:
  • I started out with two coats of OPI That's Hula-rious! followed by KBShimmer Clearly On Top quick drying top coat to speed up the drying process.
  • About 30 minutes later, I applied the full nail quatrefoil stencil nail vinyls to each nail.
  • One finger at a time, I used a tiny piece of torn sponge and tweezers for each color and dabbed them in the appropriate sections for each color: OPI Hello Hawaii Ya? and OPI This Color's Making Waves.
  • Once I finished the first nail, I carefully peeled up the vinyl to reveal the design.
  • After doing this for the other 9 nails, I applied a coat of KBShimmer Clearly On Top to seal it all in and even out the 2 layers.

What do you think? I really like the contrast of a shimmer with the creme shades. I'll probably use the rest of the vinyls again with brighter colors in the spring or summer, this color combo wasn't exciting enough for me on the nail. 

I was very happy with the quality of the Vinyl Boutique vinyls. You can find them at the Shop. I got them while on sale so keep an eye on Instagram for more sales! 

I'll have my review of the whole OPI Hawaii Collection tomorrow so check back for info on those! Thanks so much for reading!

*The polishes in this post were sent for me to review with my honest opinion.


Swatch Saturday: OPI Hawaii Collection

$
0
0
Press Sample

Good morning, readers! I have the new OPI Hawaii Collection to share with you today. There are 12 new colors, so grab a seat (imagine you are drinking out of a coconut in Hawaii) and keep reading below for my thoughts on this big collection!

        Hawaii Collection by OPI brings the fresh, bright colors of its namesake islands to nails and toes for Spring/Summer 2015. This new collection features a palette ranging from muted tones of mint, peach, pink and nude to bolder hues of coral, green, purple and gold to deep tones of mauve, violet, brick red and shimmery blue. 

“After the long months of winter, women are eager to embrace color – from soft pastels to bold accents to gleaming metallics,” explains Suzi Weiss-Fischmann, OPI Co-Founder & Brand Ambassador.  “Caught in a perpetual state of spring, the Hawaiian islands were the ideal inspiration for this year’s seasonal collection. OPI looked toward the surf, sand and sunsets found at Hawaii’s beautiful beaches, as well as the islands’ lush greenery, tropical flowers, and colorful fish, to create 12 fresh new nail shades.

There is quite a lot going on in this 12 polish collection. From soft and bright cremes to shimmers, metallic duo chromes, and an interesting glitter, I hope there's something for everyone! Let's take a look.

OPI Aloha From OPI
Let’s give a warm island hello to this bright creamy coral!
I'm showing two coats below without top coat.
I am really loving this bright coral. It will make for great pedis this spring and summer!


OPI Do You Take Lei Away?
On second thought, I can’t wait – I need this creamy nude now!
I'm showing two coats below without top coat.
There are slight patches so you may want three coats unless you are adding glitter or nail art on top of it. 


OPI Go With The Lava Flow
You can feel the heat shimmering off this golden red.
I'm showing two coats below without top coat.
This had an amazing formula and the shimmer seems to shift to a golden color as some angles making this appear more coral than red. It is one of my favorites from the collection!


OPI Hello Hawaii Ya?
In this gorgeous, dusky purple, I’m doing just fine.
I'm showing two coats below without top coat.
I like the contrast of this dusty color compared to some of the brights in this collection.


OPI Is Mai Tai Crooked?
Get it straight – this fruity orange crème is fabulous!
I'm showing two coats below without top coat.
You may prefer three coats if you do them thinner than I did. 


OPI Just Lanai-ing Around
This dark, creamy mauve says “hang loose!” in style.
I'm showing two coats below without top coat.
There is a gorgeous hidden shimmer in this, you can see it best in my macro shot. I really love this color and it's another favorite of this collection for me.


OPI Lost My Bikini In Molokini
With this reef-inspired purple, what’s one bikini more or less?
I'm showing two coats below without top coat.
Oh camera, why must you hate purple so much? It is not this blue-toned in person, I couldn't get it correct so just take my word for it. Great coverage and no issues to report.


OPI My Gecko Does Tricks
Being bright and pearly green is just one of its talents.
I'm showing three thin coats below without top coat.
There is a lot of frost in this one, but at some angles it appears to be a slight duo chrome to a golden shimmer. You can see that in my macro shot. I'm not a fan of so many brush strokes but the brightness of the color is pretty cool. I have no issues on formula to report, it is thinner but builds up at 3 coats.


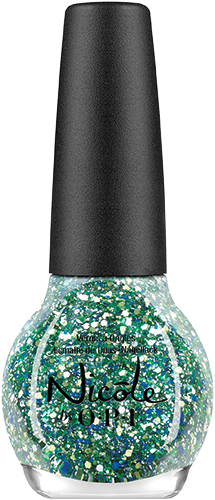
OPI Pineapples Have Peelings Too!
The heart of the matter lies in this gold shimmer with colorful sparkle.
I'm showing three coats below without top coat.
This one is a miss for me. I'm not a fan of the combination of shimmery, frosty gold base and the multicolored glitters. I wish they had picked a different base color because it may have worked if it wasn't yellow. Apply generous coats to get full coverage after 3. 


OPI Suzi Shops & Island Hops
A light and happy pink that’s the perfect traveling companion.
I'm showing three coats below without top coat.
I still saw some patchiness after three coats but it wasn't terribly noticeable.


OPI That's Hula-rious!
This pastel mint green makes me dance with joy!
I'm showing two coats below without top coat.
You may prefer three coats. It has a thin but easy to work with formula. I really like this one a lot!


OPI This Color's Making Waves
This shimmery, lagoon blue has got heads turning.
I'm showing three thin coats below without top coat.
Another one that has a thinner formula for the shimmer but builds up nicely. There are little gold flecks in this and it has a nice color shift that you can see in my macro below. There are some visible brush strokes.


There you have them! What did you think of the new OPI Hawaii Collection? Which are your top colors? Mine are Go With The Lava Flow, Just Lanai-ing Around, That's Hula-rious, Is Mai Tai Crooked, and Aloha From OPI. 

These are available now! Thanks so much for reading!

Hawaii nail lacquer shades each feature OPI’s exclusive ProWide Brush for the ultimate in application. Hawaii Collection by OPI will be available in both nail lacquer and GelColor formulas beginning February 4, 2015. Nail lacquers will retail for $9.50 ($11.50 CAN) each at Professional Salons, including Beauty Brands, Chatters, Dillard’s, Regis, ULTA and ulta.com. GelColor is an in-salon, professional service only. Prices depend on the salon and range from $28 - $38 for a manicure and $35 - $45 for a pedicure.

OPI is guaranteed only when purchased through authorized professional beauty outlets and prestige stores, not from a drugstore, supermarket, mass outlet or other unauthorized source. For more information, please call Tractenberg & Co. 212.929.7979. Follow OPI on Twitter and Instagram @OPI_PRODUCTS and go to Facebook to become a fan!

ABOUT OPI
As the world leader in the professional nail care industry, OPI is committed to providing high-quality products and services to both salons and their customers, along with a focus on industry safety and innovation. Known for its exceptional formula, fashionable colors and iconic names, OPI’s heavily-pigmented lacquers are super rich, long-lasting and chip-resistant – offering an affordable luxury to consumers. OPI nail lacquer is available in over 200 shades. Each lacquer features OPI’s exclusive ProWide Brush for the ultimate in application. Currently, OPI is available in over 100 countries and retails a full line of professional items, including nail treatments, finishing products, lotions, manicure/pedicure products, files, tools, gels and acrylics. 

*The polishes in this post were sent for me to review with my honest opinion.

Press Release: Nicole by OPI Coca Cola Collection

$
0
0
Press Release

Good morning! I just got word that Nicole by OPI is teaming up with Coca Cola for 6 limited edition, soda inspired shades. I have the press release attached below. I can't wait to see how these differ from the original OPI Coca Cola Collection release--seems interesting that they are doing it a second time. Maybe they had more than one idea for each soda and this is a way that they can release them under the Nicole line. These should be in stores now or very soon. Let's take a look:

NICOLE BY OPI TEAMS UP WITH COCA-COLA® TO PUT CLASSIC COLOR AT YOUR FINGERTIPS

THINK: Color your world with Nicole, a Coke, and a smile!

WHAT THEY ARE: Six limited edition nail lacquers inspired by the world’s best loved Coca-Cola beverages. Coca-Cola delivers beverages to meet your active lifestyle and Nicole by OPI delivers a bright palette of colors that add “pop” to your look. Available in Coca-Cola original, the lighter side of Diet Coke, the sweet citrus pop of Fanta Orange, a fruity burst of Fanta Grape, the sparkling effervescence of Sprite, and the next generation refreshment of Coke Zero. Nicole by OPI + Coca-Cola invite you to experience “The Real Thing.”

The Coca-Cola collection includes:
Always a Classic Coca-Cola
This classically gorgeous bright red is refreshingly stylish.

DC Lover
 Scintillating silver with iconic-Coke red sparkle.

The Look is Orange
 Put the squeeze on this bright and stylish orange!

In Grape Demand
 People are lining up to get their hands on this yummy plum.

Seriously Citrus
No kidding...this clean, sparkling green with refreshing, cool white is gorgeous!

Zero is My Hero
Just in time, this darkly rich burgundy has come to my rescue!

WHERE TO FIND IT: Discover the collection in the U.S. at select CVS, ULTA Beauty, Kmart, ShopKo, Harmon, and Giant Eagle locations in March 2015 for $6.99. Available in Canada at select Walmart and Jean Coutu locations for $10.99.

About Nicole by OPI:
Nicole by OPI offers a salon-quality range of bold, fashion-forward nail lacquers. The brand’s heritage is based on OPI’s well-established foundation of excellence in both color and technology, providing premium products to a broad range of consumers looking for trendsetting nail lacquers. Known for its celebrity collaborations and partnerships, the brand invites consumers to be creative and confident by expressing themselves through color. Currently, Nicole by OPI range boasts over 80 shades, and serves as the color authority for the younger demographic.
About The Coca-Cola Company: The Coca-Cola Company (NYSE: KO) is the world's largest beverage company, refreshing consumers with more than 500 sparkling and still brands. Led by Coca-Cola, one of the world's most valuable and recognizable brands, our Company's portfolio features 16 billion-dollar brands including Diet Coke, Fanta, Sprite, Coca-Cola Zero, vitaminwater, Powerade, Minute Maid, Simply, Georgia and Del Valle. Globally, we are the No. 1 provider of sparkling beverages, ready-to-drink coffees, and juices and juice drinks. Through the world's largest beverage distribution system, consumers in more than 200 countries enjoy our beverages at a rate of 1.9 billion servings a day. With an enduring commitment to building sustainable communities, our Company is focused on initiatives that reduce our environmental footprint, support active, healthy living, create a safe, inclusive work environment for our associates, and enhance the economic development of the communities where we operate. Together with our bottling partners, we rank among the world's top 10 private employers with more than 700,000 system associates. For more information, visit Coca-Cola Journey at www.coca-colacompany.com, follow us on Twitter at twitter.com/CocaColaCo, visit our blog, Coca-Cola Unbottled, at www.coca-colablog.com or find us on LinkedIn at www.linkedin.com/company/the-coca-cola-company. 

    The Digit-al Dozen DOES Nature, Day 1: Island Sunset Nail Art

    $
    0
    0
    Previous Press Sample
    Affiliate Link

    Good morning, readers! I'm alive! It was a busy week last week and I didn't have time for painting my nails or posts, sorry for the lack of communication. However, I was able to get this week's Digit-al Dozen manis ready for you! The theme is Nature and I can't wait to see how everyone does! It's so broad that I think we will have tons of variation in nail art.

    My first mani was inspired by a tutorial in my favorite nail art book (that I've shown you many times before!), Idiot's Guides: Nail Art by Emily from The Lacquerologist. Actually, the majority of my manis for this week were done using tutorials out of the book so this will be exciting!

    The Palm Trees tutorial is found on pages 144-145, in the Intermediate Designs section of Idiot's Guides: Nail Art. I remember trying a similar mani on my younger sister years ago, before the start of Adventures In Acetone, and I can't believe I've never done one on myself.


    What do you think? I really love how the gradient colors turned out together, and I still can't believe I haven't done the classic sunset palm tree mani after all of these years. 

    Idiot's Guides: Nail Art is available now on Amazon in paperback or Kindle edition! I highly recommend it!

    *Idiot's Guides: Nail Art was a previously reviewed press sample, all opinions are my own.
    *There are affiliate links in this post, which means that I get compensation if you click through and purchase.

    Thanks so much for reading! Take a look at what the rest of the Digit-al Dozen ladies did for Day 1 of Nature Week below.


    The Digit-al Dozen DOES Nature, Day 2: Leopard Nail Art!

    $
    0
    0
    Previous Press Sample
    Affiliate Link

    Good morning, readers! Are you ready for Day 2 of Nature Week with The Digit-al Dozen? I've done leopard print nail art many times, but this is the first time I've tried to match the colors and base to an actual leopard. With the help of 2 different Simple Designs tutorials from Idiot's Guides: Nail Artby Emily The Lacquerologist, I am quite happy with how this nature-inspired mani turned out!

    For my base design, I followed the Simple Gradient tutorial from Emily's book, found on pages 54-55. 
    Once the gradient was blended nicely and dry, I followed the Leopard I tutorial from Emily's book, found on pages 36-37.
    • I dipped my dotting tool into a puddle of OPI Ice-bergers & Friesand made irregularly shaped spots on the nails.
    • I then dipped the same dotting tool into a puddle of OPI Who Are You Calling Bossy?!?and created wavy outlines of the spots. C shapes, 2 bumpy lines on either side of the spot, etc. 
    • I filled in some of the empty spaces with dots and swipes of OPI Who Are You Calling Bossy?!? using the dotting tool.
    • KBShimmer Clearly On Top was used to seal it in.


    What do you think? Do you have a polish color like the one I had to mix for the leopard base fur? This isn't the first time I've done this to get the "right" color I have in mind, and it helps if you don't have a huge polish collection. I just find it easier to do if you are using it for nail art or sponging it on, rather than trying to paint it onto the nails as a full color. 

    Idiot's Guides: Nail Art is available now on Amazon in paperback or Kindle edition! I highly recommend it!

    *Idiot's Guides: Nail Art was a previously reviewed press sample, all opinions are my own.
    *There are affiliate links in this post, which means that I get compensation if you click through and purchase.

    Thanks so much for reading! Take a look at what the rest of the Digit-al Dozen ladies did for Day 2 of Nature Week below.


    Viewing all 679 articles
    Browse latest View live


    Latest Images