Good morning, readers! It's Tutorial Tuesday! I had another poll on instagram and you voted for this recent mani I did for Digit-al Dozen this month over the hippos. I had a huge response to this mani and it is so easy to create on your own nails!
![]()
Here is a look at the original mani to refresh your memory:
![]()
![]()
![]()
![]()
![]()
![]()
![]()
![]()
![]()
![]()
![]()
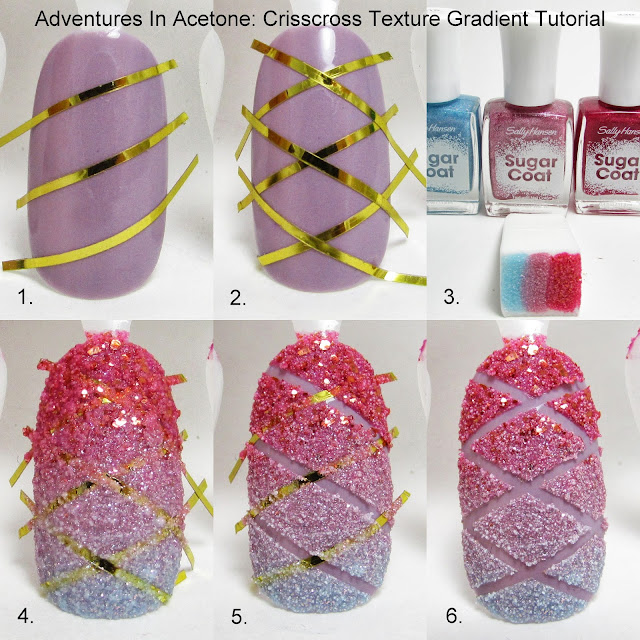
Here is a sneak peek at the step by step process. You can find full sized images and step by step instructions further down in this post:
Here is a look at the original mani to refresh your memory:

The things needed for this look:

Elevation Polish Tavan Bogd, Sally Hansen Sugar Coats in Royal Icing, Treat-Heart, and Pink Sprinkle

Any color striping tape and a triangular makeup sponge.
Step 1) Paint two coats of Elevation Polish Tavan Bogd and let dry completely before moving onto the next step (or add a coat of quick dry top coat to shorten the wait time).

Step 2) Cut three pieces of striping tape and lay diagonally across the nail in parallel stripes. Press down firmly.

Step 3) Cut three more pieces of striping tape and lay diagonally across the nail the opposite direction from the last step. This should give you some diamond shapes between the striping tape. Press down firmly.

Step 4) Use all three Sally Hansen Sugar Coat polishes to paint stripes onto the end of the makeup sponge. The first coat will be absorbed into the sponge so you will want to do a second coat. Make sure you have the stripes touching, or even overlapping the tiniest bit, so there aren't any bare parts on the sponge.

Step 5) While the sponge is still wet, press down flat on the nail. Pull straight up again without dragging the sponge on the nail. I like to do step 4 and 5 two times to get a good amount of polish on the nail and over the striping tape.

Step 6) Slowly peel off the striping tape in the direction of the tape. Make sure to peel up the second set of tape and not the first set. The second set is crossed over the first set so you have to take the tape off in the reverse order of how you applied it.

Step 7) Finally, peel the tape off carefully from the first set. This should reveal a fun, raised texture of diamonds/quilting and clean lines of the purple base color.

And YOU'RE DONE! No top coat for this design, the texture is the best part of it!
A side note: This can make your fingers around the nail VERY messy with where the sponge was wider than the nail. Here is what mine looked like before cleanup:

I highly recommend either: painting elmers school glue on the skin around your nails and allow to dry before doing your nails(you can gently scrub off the polish+glue layer under warm water and even gently use an orange stick to peel it up), or taping around your nails like you would do for a watermarble for less cleanup after you remove the tape. I, unfortunately, did not do either of those and spent a long time with acetone, q-tips, and a clean up brush to get it to the photos you saw in the original post.
Thank you so much for reading! Have you tried any of my tutorials? I'd LOVE to see them, please upload your pics to my facebook page or tag me on Instagram!